Wednesday, October 17, 2018

Ink on 3 Holiday Blessings Blog Hop

It's blog hop day for InkOn3! And that means a new release as well. Take a look.


Super cute stamp sets, right? And coordinating dies as well. Lots of great sentiments for many holidays!

Buy all three stamp sets and save 20%.
20% off dies if you purchase both sets. Use coupon code holidayblessingsdies

Here's what I made.


I stamped out my images on different patterned papers. I like doing that sometimes, esp when the patterns are real small. I did several of the poinsettia and holly leaves. For two of the flowers I layered up smaller ones onto the biggest one using foam squares.

I chose my background paper because it's holographic and it looked to me like holiday ornaments. So hard to capture but so pretty!


I began by figuring out my floral placement and stuck them down with a little bit of adhesive in the center, so I can still tuck the greenery underneath.  

I added liquid glue to the centers of the flowers and sprinkled on some chunky glitter. I love doing that for centers, it's so sparkly! I stamped out the sentiment in Juicy embossing ink and embossed with Chrome embossing powder. Trimmed it down and added with foam tape.


for the inside of the card I put together this phrase. I love the sentiments for Christian holidays in this release. Very nice!

So that's it. 

Here's the blog line up. Be sure to visit them all.

    Ilda Dias  

 Comment on each blog post to be entered to win one 25.00 InkOn3 shopping spree! Giveaway will close on October 24th at noon CST and winners will be posted on the InkOn3 blog.

I'm sure you will love all the ideas of the team! Don't forget to comment to win.

Here's where you can get the products I used and the entire release.


Enjoy the hop!
Happy paper crafting


Saturday, October 13, 2018

InkOn3 Sneak Peek 10/2018

Hello Crafters!

I'm up on the InkOn3 blog today. Showing a sneak peek of the new release coming the end of the week. Super cute holiday stamp sets and some amazing sentiments, too!

Here's what I did today.


I stamped out the images using Blackout ink. Then I colored them using my Copic markers. I cut them out with my Brother Scan N Cut, since I don't have the dies as of today. Love that machine, lol!

I stamped out the evergreens using some Altenew inks. I then used foam squares to pop up the flowers.
I cut the berry branch apart so I could use just the top berry part. Yep, stamp surgery!


I chose a sentiment and heat embossed it using the Chrome embossing powder and the Juicy embossing ink. I love this one as it is so so so shiny!!!

I filled the centers with some liquid glue and added some chunky, silver glitter I have in my stash. I adore this glitter so much! It really packs a wow.

I brushed over all the images using my Nuvo Shimmer brush pen. It adds so much shine but very difficult to capture in pics.

I chose a die from my stash and cut it with my Gemini Jr. I backed it with a lovely patterned paper from Lawn Fawn. Then I used some red fun foam and popped that onto a red card base.

How amazing is that Chrome embossing powder! My favorite, for sure.

I finished it off by adding some silver gems and couple of green ones.

And that's it! 
Here's your shopping list.

Studio Katia ~ Gems
Altenew ~ Inks

And there you have it. I hope you get a bit of inspiration from my posts. I not one of the fancy crafters, but I do think my cards look nice, lol. I'm not a real fussy crafter...I tend to keep things easy, but neat and well balanced. 

Pull out your supplies, fined some crafting time...and have some fun!


Sunday, October 7, 2018

Ink On 3 Merry Christmas

Welcome to the blog today. I have a Christmas card to share using a past stamp release. 
Hope you like it!


I picked out the Merry Christmas sentiment stamp. Since it was all connected in length and I wanted it shorter, I cut it in half. Yes, you can do this, lol. Just put it back together next time you want it long again. No biggie!
Anyway, I used the GinaK wreath builder template to stamp out a wreath shape using this sentiment. I chose some Altenew inks and since they come in four shades, it worked perfect to get the ombre feel. 
I then chose a few more images to "fill in" around the words. I stamped the notes in a gold ink, Delicata brand, I believe. 


I also grabbed the star image and stamped it in a nice holiday red ink. 

To create the center piece, I stamped out the bow and bells with Juicy Embossing Ink and heat embossed using the Black As Night embossing powder. I then used the same red ink and the same Delicata gold ink, and my Wink of Stella glitter brush pen and colored in the image. I love doing this because you get the amazing sparkle and it is SO pretty!!! And it really made the bells appear metallic. 

I  grabbed a circle image from my stamp stash to kind of frame the image. I used the Blackout Hybrid Detail Ink for this. I then cut it with a circle die. I layered it onto a scalloped circle that I colored using the darkest ink pad, direct to the paper. Easy way to make your own colored paper, perfect match. 

Before adding the center point piece, I used a square, stitched die from my stash and cut the panel down and added it to a 4.25 square card base. 

I popped that up to the center of the panel using foam tape. 

To finish it off, I grabbed some sparkling black crystals from Honey Bee Stamps, and spread them all around the piece for that holiday sparkle! You get bits of gold, green, teal, and black. They are SO pretty. 

And that's it. Hope you like my project today and will come up with your own design. 
Here's your shopping list.


There you go....happy crafting!


Friday, September 28, 2018

Dance & Twirl Christmas Gift Tags

Hi crafters
I have a short post today, with just pics and links to the projects used. Pics are pretty self explanatory and I'm certain you can recreate them yourself.


How adorable would these tags be tied to any gift or treat! Such darling critters.


As seen on the back, I stamped the To and From, but you could certainly leave it blank or put whatever you'd like.

Images were colored using Copic markers.

Here's your supply list.


Happy Crafting


Friday, September 14, 2018

InkOn3 Dance & Twirl Blog Hop


Hope you're ready for some cuteness overload! It's new release day over at InkOn3.
And it's adorable!!! 
Wanna see??? Here ya go.


How cute is this stamp set??? The moment I say it, I was in love. Here's a pic of my blog post the other day.


Now, on to my project for this hop. I might say, the giraffe was my favorite image right from the start!


I mean...come on! Cute right? 
How do you get any cuter than this? I stamped out the images onto the bits left after die cutting this frame/window die from Pretty Pink Posh. I used Blackout ink. It's a great, dark black ink for any coloring medium. I set about to color my images using my Spectrum Noir alcohol markers.


I made the three smaller windows into shakers. I filled them with seed beads. 
Instead of mounting the larger image under the acetate, I mounted it on the outside using foam tape for added dimension. 
I brushed a glitter/sparkly pen over the tutu and the sentiments.


Ok...don't look too close. I made a big mistake....but I wasn't gonna go back and fix it. I'd have had to start all over! I forgot to color the flowers in the hair on the three small images. My bad, lol.
Just pretend, oh?

I ran a piece of hot pink paper through an embossing folder. I like the added texture of the dots. I mounted that to an A2 sized card base of heavy white cardstock. I then added the shaker element onto the top of that using liquid glue. 

So, that's it. Hope you enjoyed my project. Here's the list for the blog hop lineup.

Courtney Miles

Comment on each blog post and be entered to win one $25 shopping spree! Giveaway will close on September 21st at noon CST and winners will be posted on the Ink on 3 blog!

There's a 15% off coupon code for the hop, it's
dancetwirl15

You're gonna love all the inspiration from our team! Be sure to comment! You'll for sure wanna have a chance to win!

Here's your shopping list.


There you go. Make sure you check this out, and the deal you'll get...cause it won't last!


Monday, September 10, 2018

Dance, Dance, Dance

Hi Crafters, Cheryl here today, with another project ad a sneak peak at the new release stamp set this month for InkOn3. 
And it's a super cute one!!!


Dance & Twirl
Isn't it just adorable!!!

Let me show you the tag I made using one of the images and sentiments.


EEK!!! I loved these images the moment I saw them. Stinkin Cute!!!
I pulled out my Copic markers and colored this adorable dancing mouse. I can't even! Anyway, I colored it up and cut it out with my Brother Scan n Cut...the dies weren't available at the time of this post.
I brushed on some sparkle brush and added some white gel dots to her top.


I cut a tag using a die from My Creative Time...my go to tag die, for sure! I laid a stencil over it from Altenew. I used an ink blending tool and some green inks from Altenew and blended it on, dark in the center going out to light. I then brushed some sparkle brush marker over the "rays".
I attached the mouse to an Action Wobbler and centered it over the rays.


I stamped the word Dance three times using Blackout ink and cut them out with the Scan n Cut. Glued them all together, brushed with a sparkle pen and coated with Glossy Accents. Set aside to dry!

I then pulled out the sub sentiment and stamped in the teal color. I cut it using the tag die again to get the same stitching on the edges. I aligned it near the bottom of the tag and attached with liquid glue.

I added some gems from Studio Katia and when the Glossy Accents was dry I added "Dance".

To finish off the top, I tied a bit of ribbon and twine matching the colors in the project.


Isn't it just the cutest??? I love those Action Wobblers. They make everything so fun. 
I hope you like my tag today and go pull out some of your supplies and make something pretty of your own.

Here's what I used.

Dance & Twirl Stamp Set

There you go. No link to the stamp set as it in the store of this posting, sorry.
Keep checking the store, it should go live in a week or so, maybe even this week...not sure of that.
Also, a blog hop is coming on September 14, 2018. Watch for that!


Happy crafting, 
Cheryl


Friday, August 31, 2018

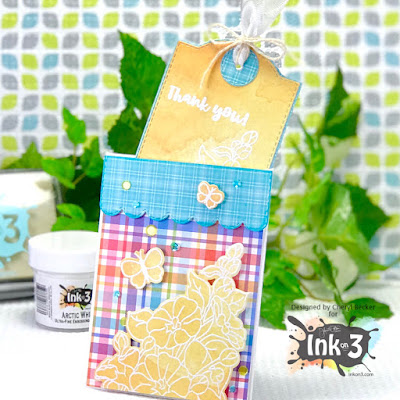
Thank You Tag And Pocket

Hey crafty friends, Cheryl here today for a post for InkOn3.

I made a fun tag good for any reason. I made a thank you tag. You could tie it on a goodie bag or attach it to a card base. Tags are so fun and good for any occasion.


I pulled out a pocket die I have in my stash from My Creative Time. It's such a fun pocket and the tags fit perfectly. I cut it first from white heavy weight cardstock and then from some lighter weight patterned paper from Lawn Fawn. I then glued it to the white base.

I then stamped my image onto patterned paper and white heat embossed using Juicy embossing ink and Arctic White embossing powder from InkOn3. I then used the coordinating dies and cut out one of the florals and the little butterflies. 
For the tag, I first die cut it and then stamped and embossed.


For the tag, I first die cut it and then stamped and embossed. Again using Juicy ink and Arctic White embossing powder. I layered the top layer onto the bottom one and then added the reinforcement circle. I also cut one in plain white paper and attached to the back for a place to write your note.


I stamped a thank you sentiment and embossed it as well. 

So that's it. Super easy but super cute and can be made for any occasion or holiday. The sky is the limit on something like this.

Here's the shopping list.

Studio Katia - Crystals
Lawn Fawn - Patterned Paper

So that's it. Get out your supplies and craft up your own designs. I hope that this gives you a few ideas!
Happy Crafting


Tuesday, August 14, 2018

InkOn3 Embossing Powders Blog Hop

Hey Crafter! Let's hop, shall we?


Today is a new exciting product release! EMBOSSING POWDERS!!!
Yep, that's right. And they are amazing! Super fine, no added waxes or fillers, and they melt amazing!

Arctic White
Chrome
Gold Rush

Let me show you what I did using the Chrome.


I used the Dogwood Flower stamp set to create a frame around a 4 x 4 piece of cardstock. I stamped using the Juicy ink and added the Chrome embossing powder and melted it. This is a fabulous silver! It is so shiny and you have got to see it in person. Photos and descriptions don't do it justice.


I also created a matching envelope using the Envelope Punch Board from We Are Memory Keepers. The directions are on the board for the size envelope you wanna make. 
I then die cut a label using a die from my Spellbinders stash. I stamped the sentiment and embossed again using the Chrome. I cut a second label from silver glitter paper, cut it in half, and attached it so the two ends show the glitter.
I attached the 4 inch square panel to a 4.25 x 4.25 card base using foam tape. I then added the label, also with foam tape.


I tried my best to capture the shine. This shows a bit. It's hard on white but I wanted this to look really clean. I added a few crystal gems to the front and I brushed my Spectrum Noir sparkle brush into all the flowers. The sparkle is amazing! You gotta try this powder so you can see for yourself!

Here is the blog hop line up.


Comment on each blog post to be entered to win one $25 InkOn3 shopping spree! Giveaway will close on August 19th at noon CST and winners will be posted on the InkOn3 blog!

Grab all three Ultra-Fine powders and save 20%. This week only! Use coupon code bosshop20. You will save 20@ on all new powders and our inks!

Here's where you can get the products used in this project and so much more!

InkOn3
Juicy Ink
Dogwood Flowers Stamp Set
Chrome Embossing Powder
Arctic White Embossing Powder
Gold Rush Embossing Powder
Studio Katia Crystals
Envelope Punch Board
Spectrum Noir Sparkle Brush Pen

Have fun hopping and get your craft on!


Tuesday, August 7, 2018

Brand New Product Showcase

Welcome!
Today we are showcasing a brand new product from InkOn3!!!
How exciting is that??? Any guesses?
Well...IT'S EMBOSSING POWDERS!!!
Yes, and they're amazing, too. 


 This is amazing powder. It's milled to ultra fine and no added waxes or fillers. It is the finest I've used! You are gonna love it!
So, here's what I did using the Arctic White and the Gold Rush powders.


I have some widow sheets that you can emboss on. So I used my anti static powder very liberally!!! I then stamped my image with Juicy ink and poured on the Artic White powder. And then used my heat tool to melt it. Keep your tool moving or the acetate will warp.

 Then I choose to use a white woodgrain paper for my card front. I used the coordinating die for the floral stamp and cut it in the center of the card front. Next, I aligned the embossed acetate so it fit right in. I had already added double sided tape to the back of the card front so it would stick right in place. I then used a double layer of foam tape all around the window to fill with sequins.


I wanted to totally fill the space so that all you would see is the sequins making the color of the flower. I chose shades of purples. I then closed up the back with some purple cardstock to carry on that color.
I cut a strip of vellum and stamped the sentiment after prepping with my anti static powder. I poured on the Gold Rush embossing powder and melted with my heat tool. I backed it with the same purple cardstock and wrapped the edges behind the card front.
I finished off with a few sequins and attached the card front to an A2 card base of heavyweight white cardstock.

So, there you have it. This embossing powder is fantastic and I know you will love it. It melts so smooth! And the white is VERY white! And the Chrome??? Well, it's my favorite!

Here's where you can get these items.


Head on over and check out the store. Fleurette has such cute stuff. And the inks are great! And you will love these new powders.

Happy Crafting! 


Wednesday, July 25, 2018

Hey You...

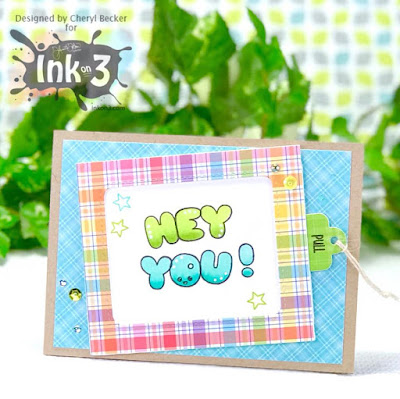
Hey crafters, Cheryl here today, with a super cute slider/window card to share with you.
Here's the stamp sets I used.


This is probably one of my all time favorite InkOn3 stamp sets! I mean, come on, what's not to love???
Anyway, I stamped out a few of the images and colored with Copic markers. And I didn't even do any shading, simple one marker coloring. Maybe I better show you what I used to make the card first.

 
I used this die set from Lawn Fawn. There are videos on YouTube to show how to assemble, it's easy!
On the pull tab/slider piece I stamped "Hey You" using the Phat Alphanumeric stamp set using Blackout ink. I colored them in with Copic markers and stamped a few stars.

 I cut one piece of cardstock just a tad smaller and stamped my inside. The dragon, the flame, and the candle. I also stamped some stars.

 I again colored these with simple one marker coloring. On the flame and candle I used two. Following the instructions in the Lawn Fawn assembly video I closed up my slider. I'll link the video at the end.
Then I went through my patterned papers and pulled out some to match my color pallet. I picked a blue pattern and adhered it to an A2 card base of Neenah Desert Storm cardstock. 
I then added the slider to the front of that on an angle. 
I picked out some gems and sequins and added to the front. DON'T put any in the way of the pull tab slider or it won't open. Ask me how I know, lol. I pulled out my Nuvo glimmer brush and picked a few areas to add shimmer to. It makes things look so pretty!

And that's it! It's so fun to make this type of card and fun for the recipient! If you're a paper engineer, you could probably make this slider from scratch. I'm not, and knew I'd use this often so I picked up from Amazon. Glad I did!

 Lawn Fawn Magic Color Slider (video on their website) 
Ok, take some time for you and sit down to "play" with supplies you have.
Happy Paper Crafting!